
Elastic Compute Cloud (EC2)
Amazon EC2 (Elastic Compute Cloud) is a core service offered by Amazon Web Services (AWS) that provides resizable compute capacity in the cloud. It allows users to rent virtual servers, known as instances, on-demand, enabling the deployment of applications and services in a scalable and cost-effective manner.
Budget Setup
Prior to start playing with EC2, it is very important to setup budget in order to avoid unexpected bill.
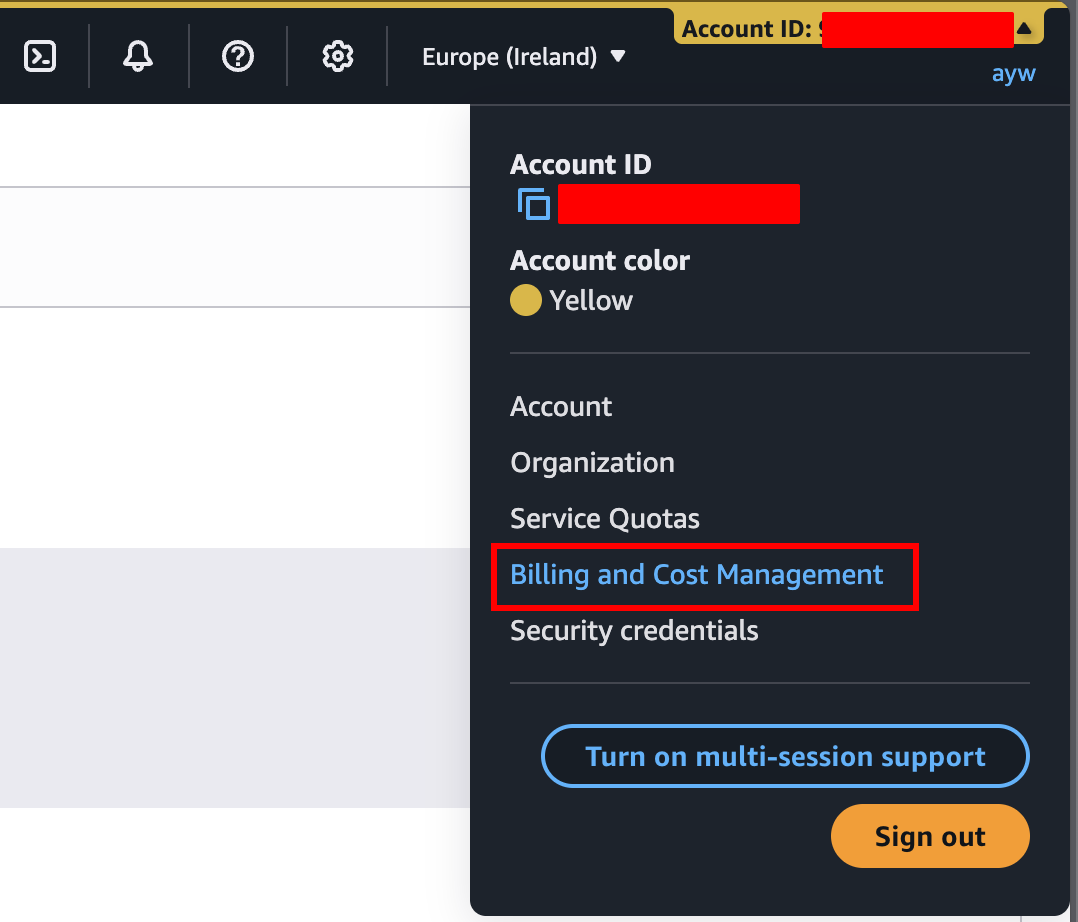
Click the top right conner and select Billing and Cost Management to open Billing and Cost Management page.

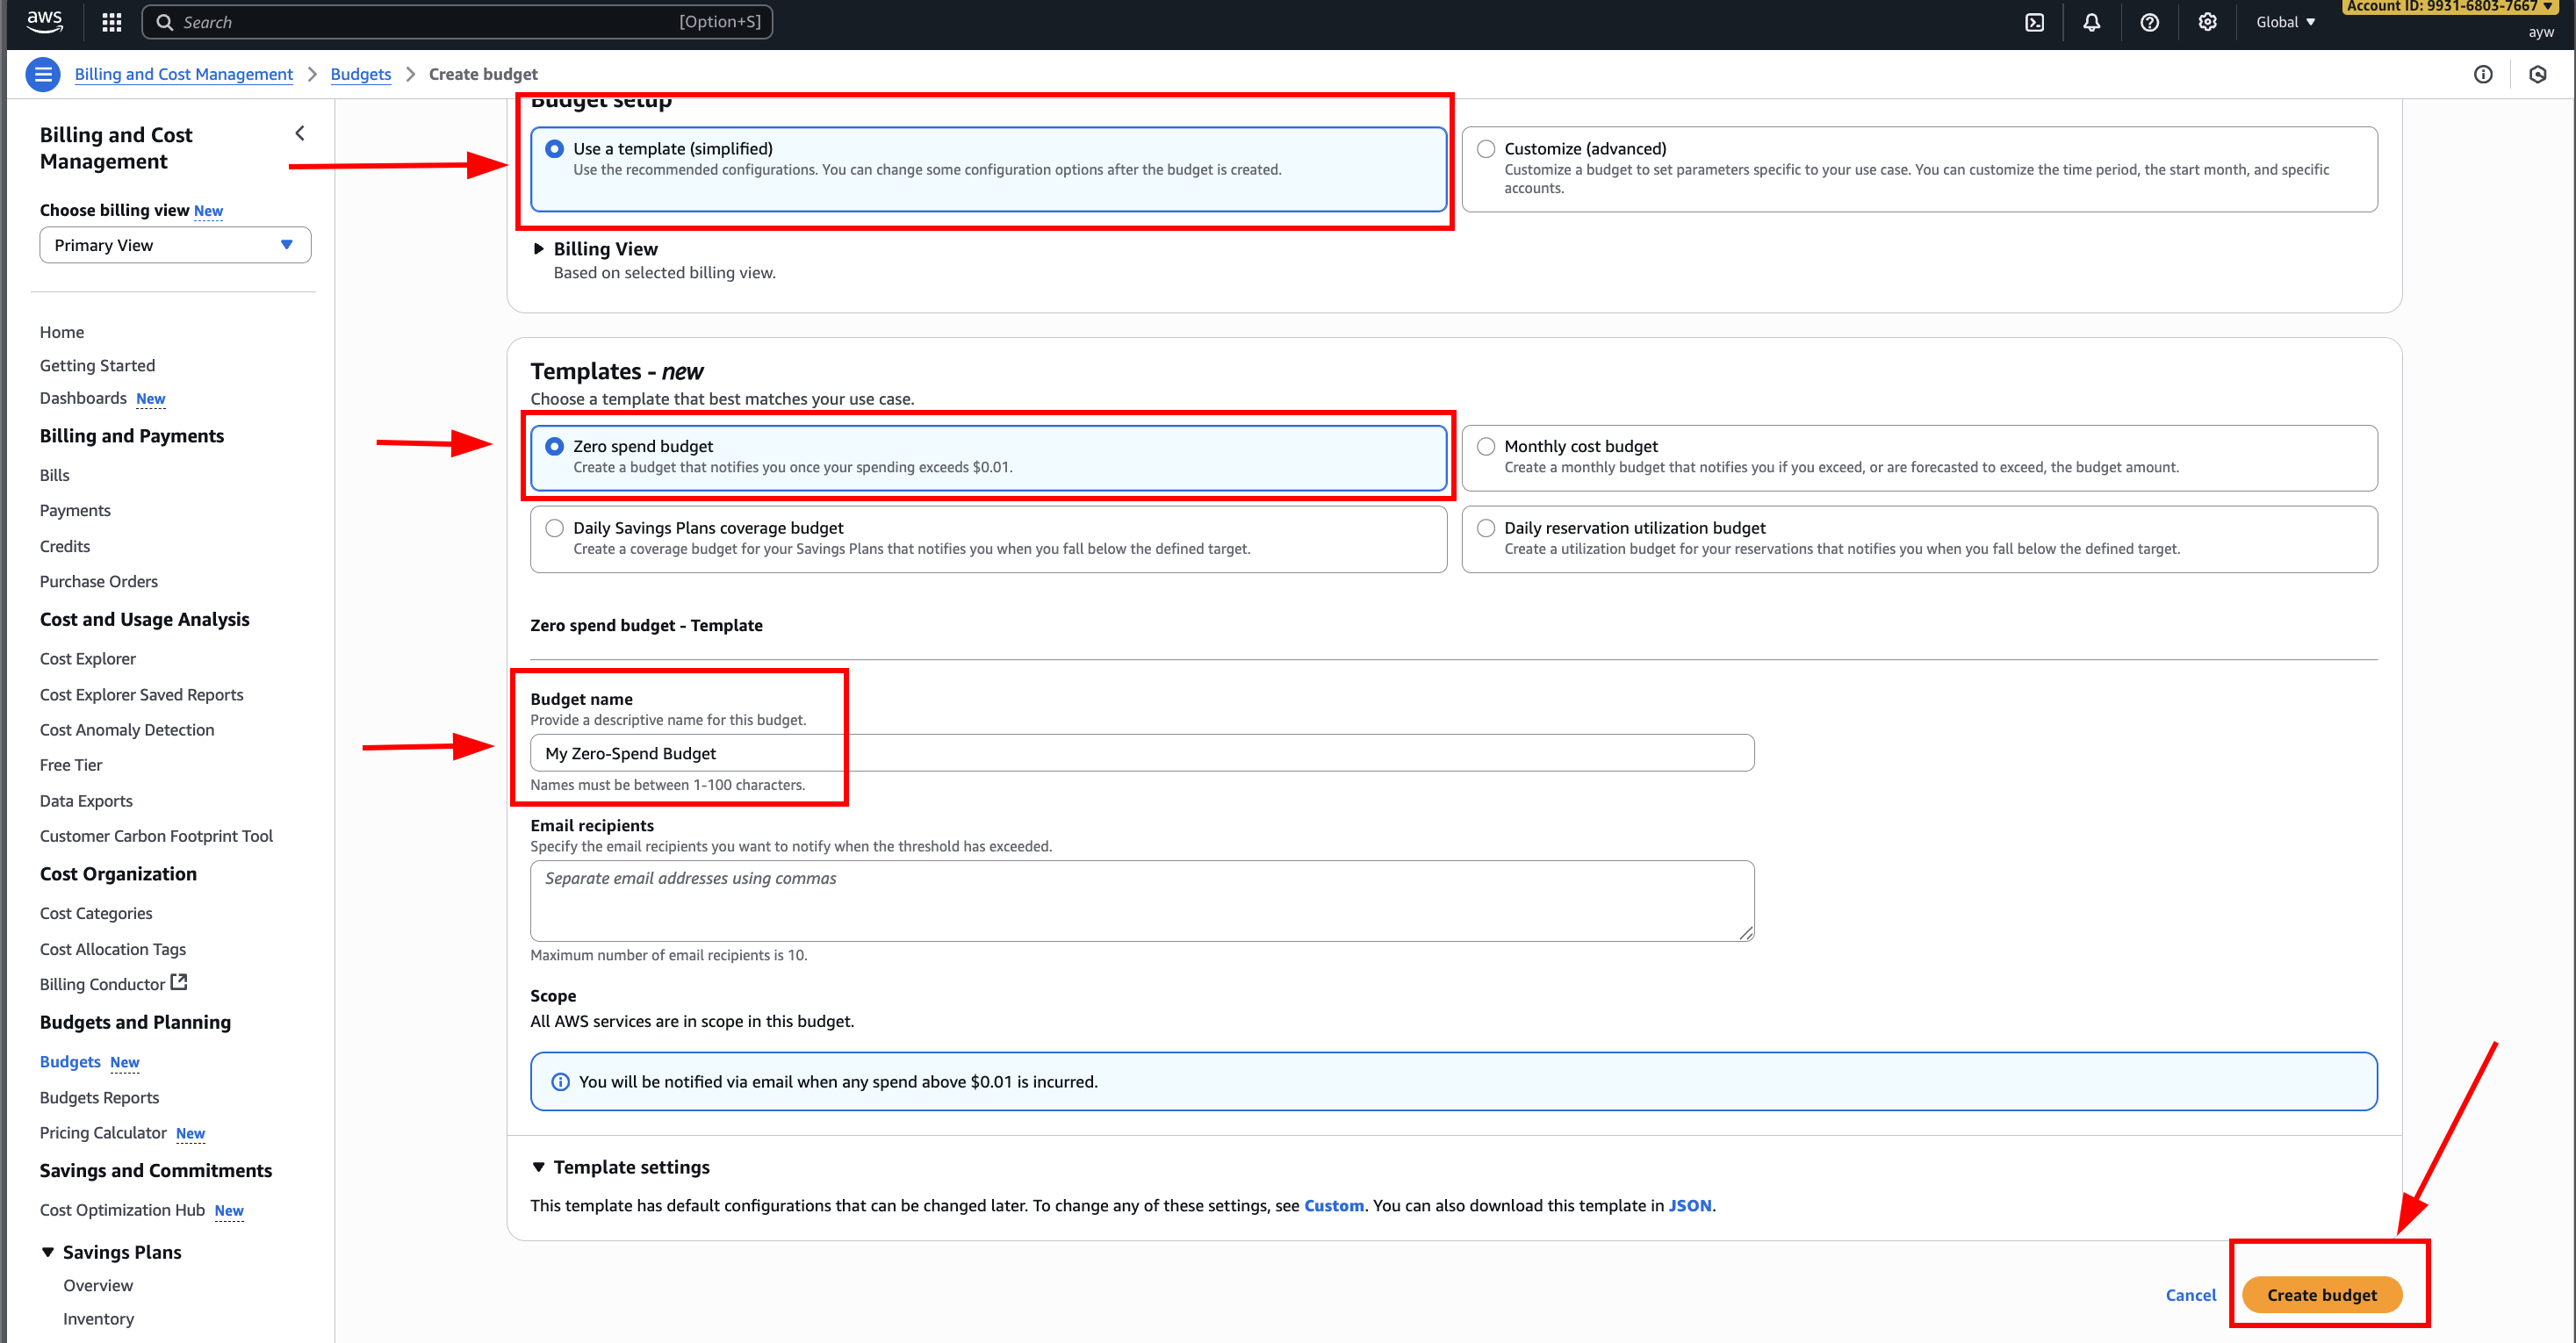
Create “Zero spend budget” with configuration as following picture:
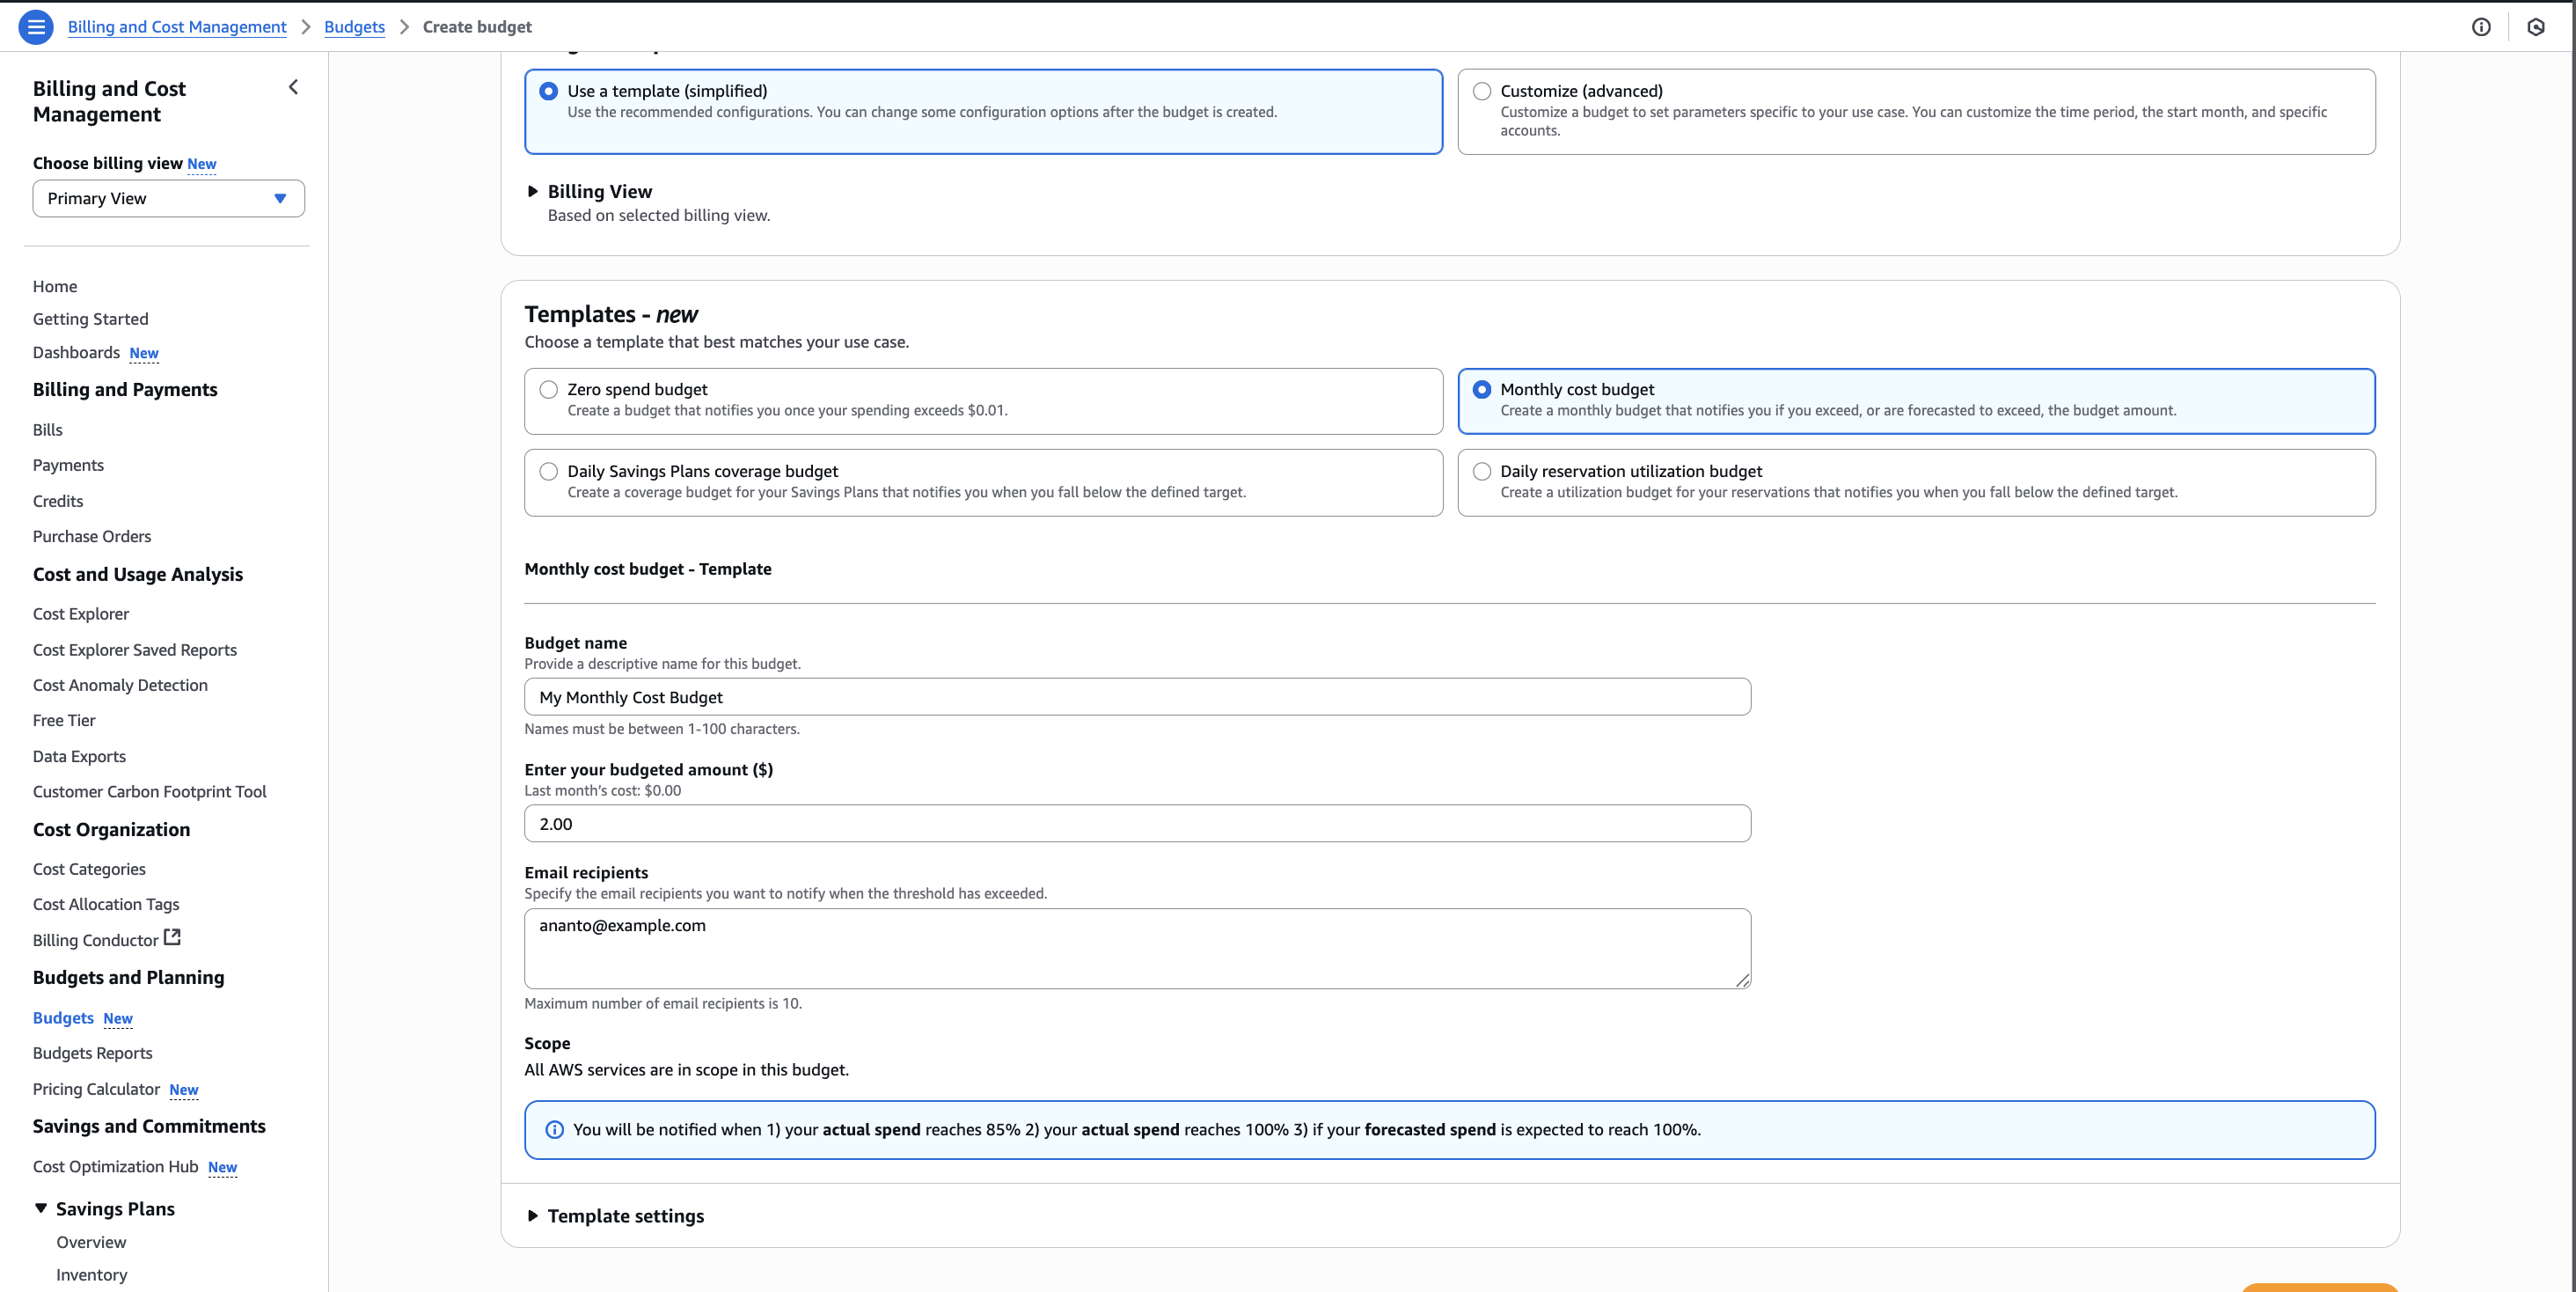
Additionally create “Monthly cost budget” with configuration as following picture:
Security Group Overview
The browser can display because the Security Group inbound rule allow it
- Security groups are acting as a “firewall” on EC2 instances
- They regulate:
- Access to Ports
- Authorised IP ranges
- control of inbound network (from other to the instance)
- control of outbond network (from the instance to other)
- can be attached to multiple instances
- locked down to a region /vpc combination
- does live “outside” the EC2 - if traffic is blocked the EC2 instance won’t see it
- it’s good to maintain one separate security group for SSH access
- if your application is not accessible (time out), then it’s a security group issue
Hands-on
Create First Instance
- on the top search bar, search
ec2, then click enter to view instance dashboard.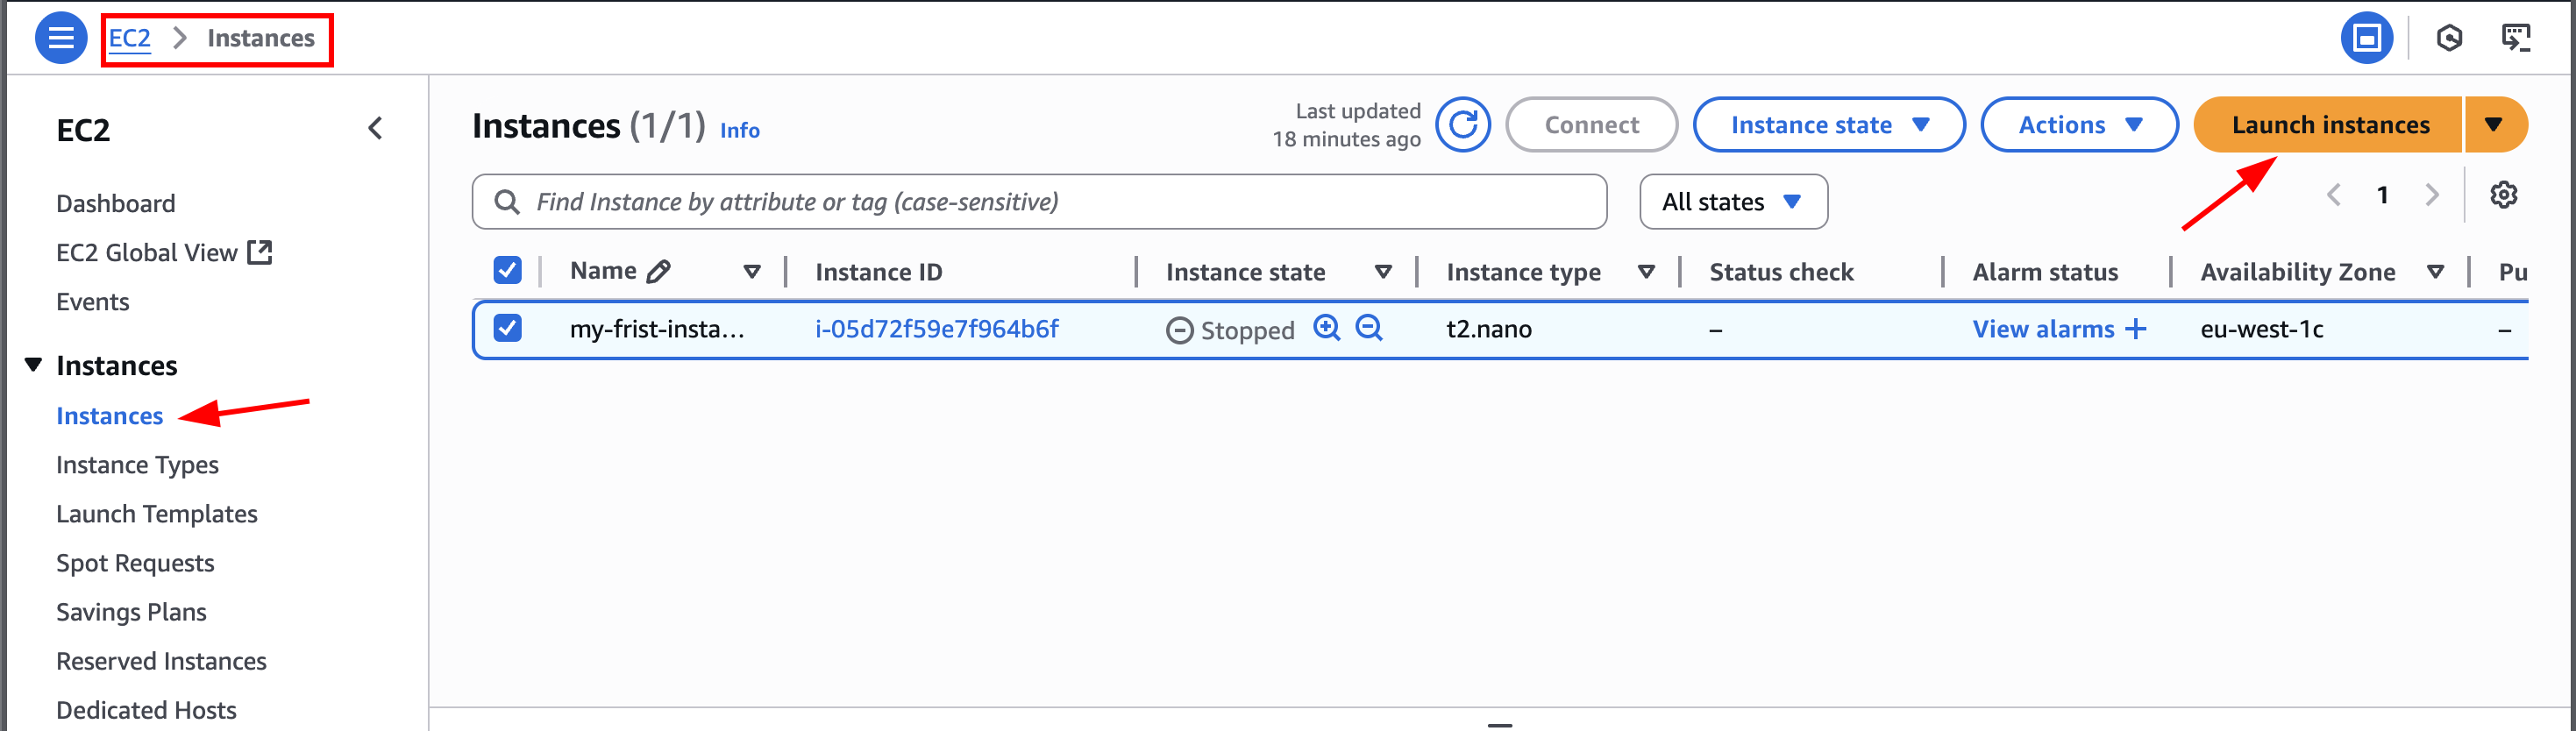
- on the left bar, click
Instancesthen clickLaunch Instance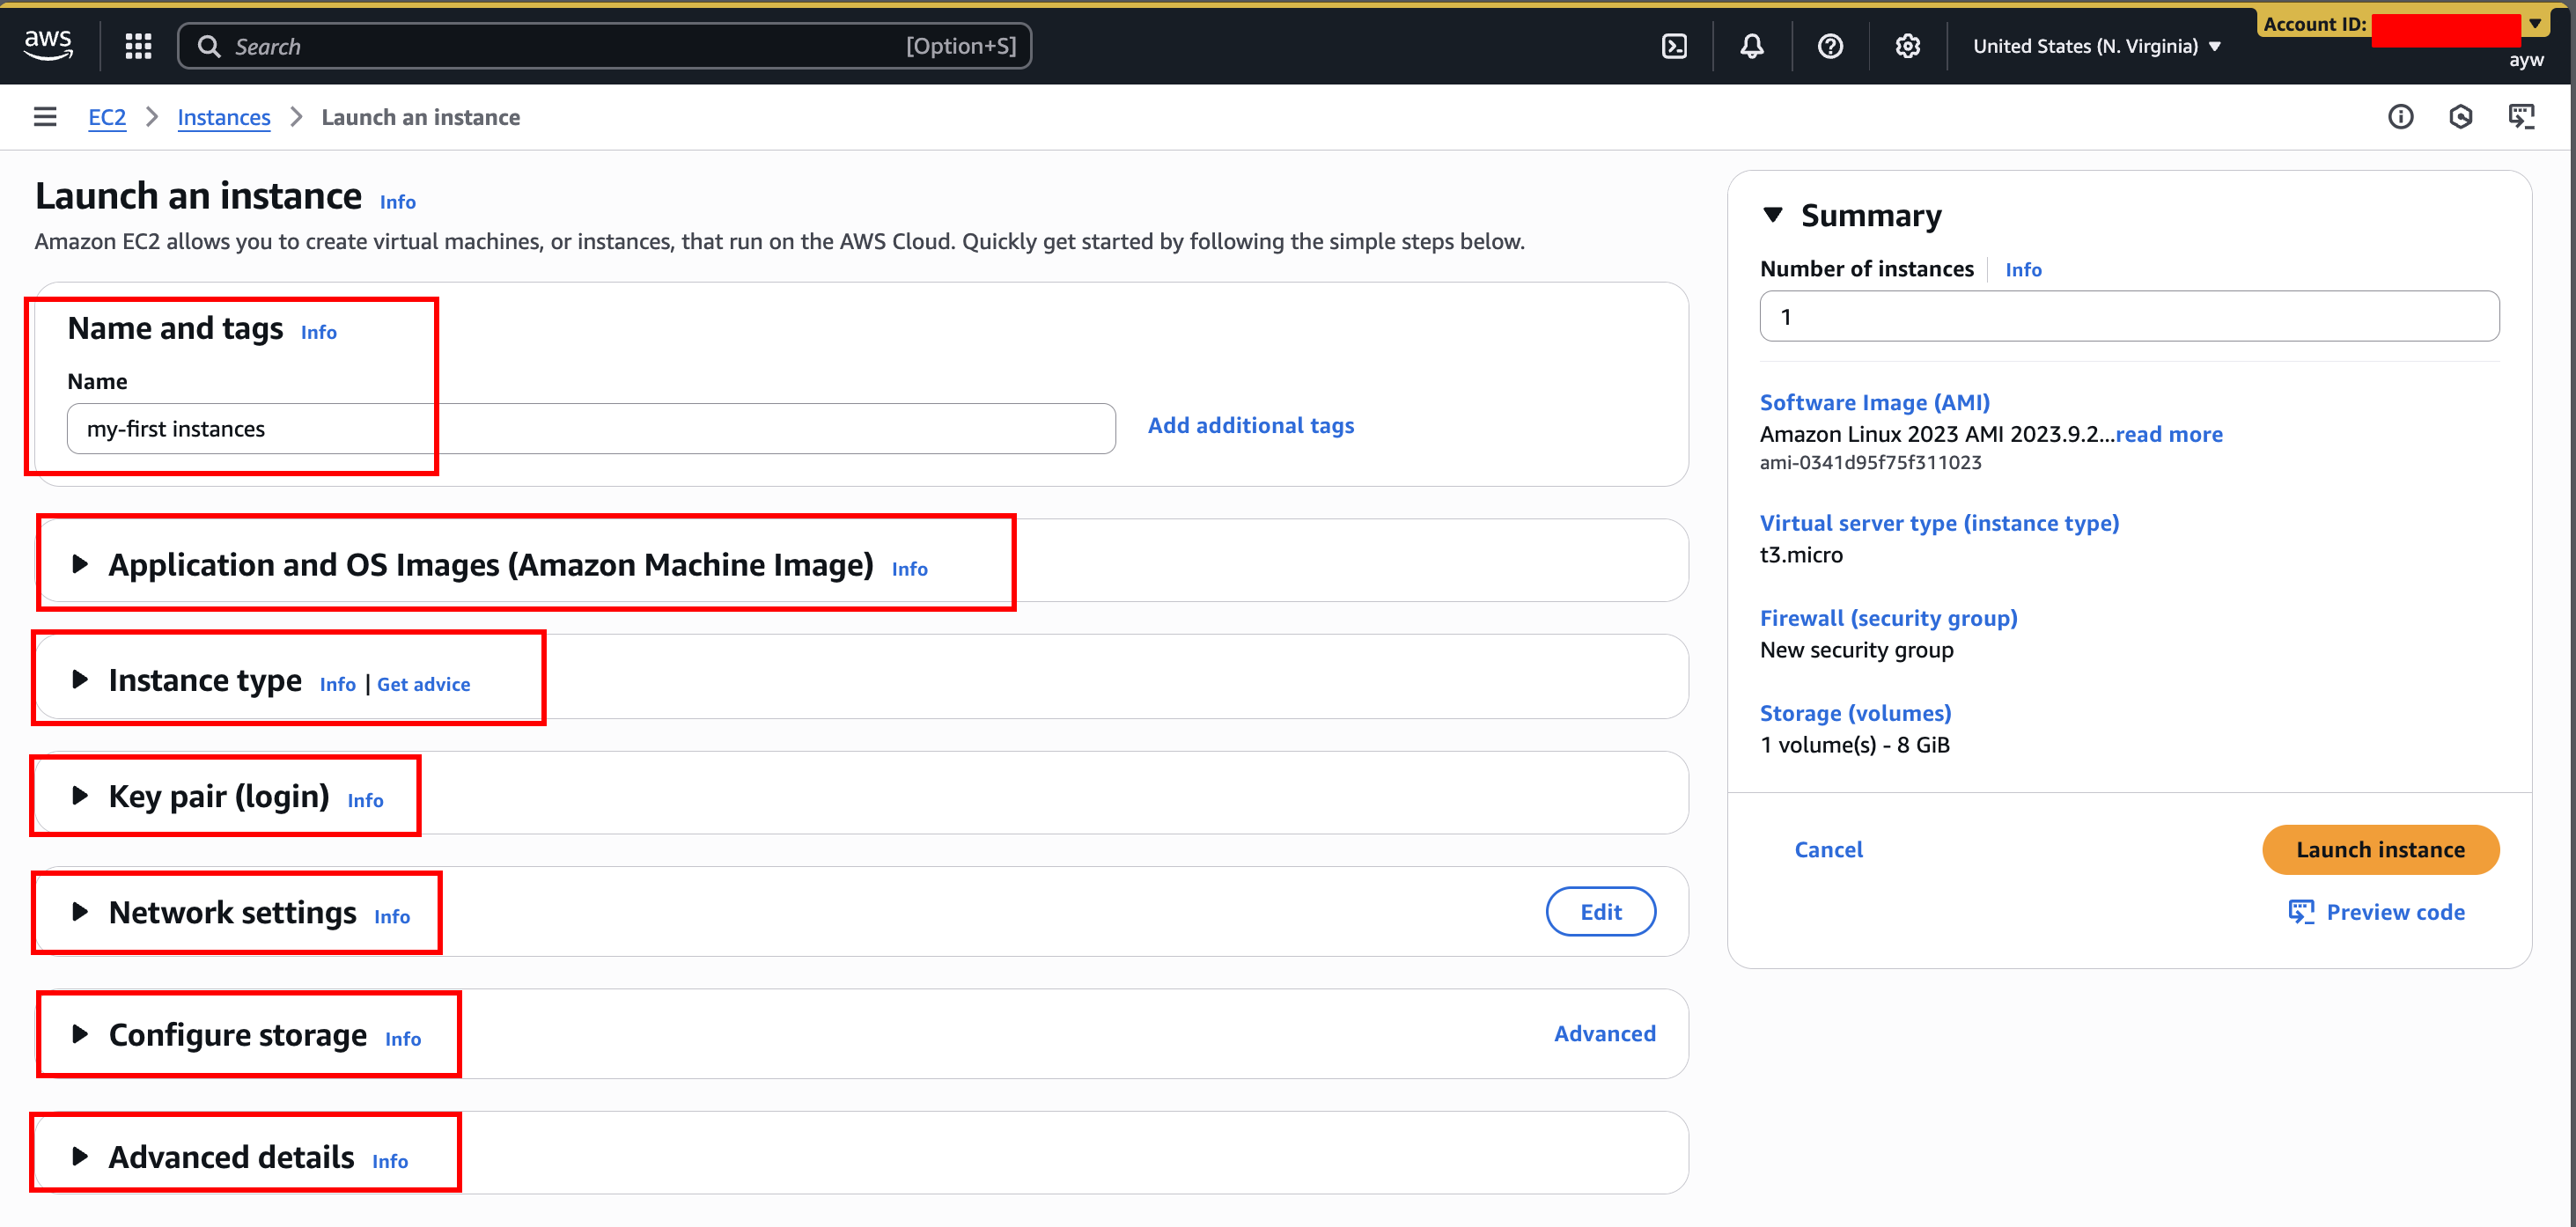
- on the “Launch an instance” page, input the following
3.1. input name and tags
3.2. on the section “Application and OS Images” select “Amazon Linux”
3.3. on the section “Instance Type” select the smallest one (in my case t3.micro). more information about the type -> https://instances.vantage.sh/
3.4. on the section “key pair (login)” select one or create new pair
3.5. on the section “network setting” check “Allow SSH traffic from Anywhere” and “Allow HTTP trafic from the internet”
3.6. on the section “configure storage” choose the smallest one
3.7. on the section “Advanced details” - “User data - optional” put this script
sh #!/bin/bash yum update -y yum install -y httpd systemctl start httpd systemctl enable httpd echo "<h1> Hello world $(hostname -f)</h1>" > /var/www/html/index.html - After complete the configuration, click button “Launch instance”
- click the instance on the instance dashboard. On the detail tab, copy the “public IPv4 address” and paste it to your browser
- You will see the browser display “Hello world” like this

SSH to instance (mac/linux)
- open terminal
- connect to ssh via command
ssh -i path/to/file.pem <username>@<ip_public>
- the *.pem file is generated in the previous step 3.4
- the username can be seen during ‘Launch an instance’ under username lable
- if this is failed like:
then run
1
2
3
Permissions 0644 for 'file-name.pem' are too open. It is required that your private key files are NOT accessible by others. This private key will be ignored.chmod 0400 path/to/file.pem
EC2 Instance Roles Demo
- create an instance with Amazon Linux
- try to run
aws iam list-users - it will says unable to look at credentials.
- To solve this, you can configure credentials by using
aws configure. But this is a really bad idea. - The best practice is to create new role - in IAM menu - with permission,
IAMReadOnlyAccessin this case, and attach it to the instance
Purchasing Options
EC2 On-Demand
- pay for what you use
- has the highest cost but no upfront payment
- no long-term commitment
- recommended for short-term and un-interrupted workloads, where you can’t predict how the application will behave
EC2 Spot Instances
- can get a discount up to 90% compared to on-demand
- can ’lose’ at any point if your max price is less than the current spot price
- the most cost-efficient instances
- useful for workloads that are resilient to failure
- batch jobs
- data analysis
- image processing
- any distributed workloads
- workloads with a flexible start and end time
- not suitable for critical jobs or databases
EC2 Dedicated Host
- a physical server with ec2 instance capacity fully dedicated to your use
- allows you address compliance requirements and use your existing server-bound software license
- the most expensive option
- purchasing option: on-demand vs reserved 1-3 years (no upfront, partial upfront, all upfront)
- useful for software that have complicated licensing model (BYOL)
- or for companies that have strong regulatory or compliance needs
EC2 Dedicated Instance
- Instances run on hardware that’s dedicated to you
- may share hardware with other instances in same account
- no control over instance placement (can move hardware after stop/start)
Capacity Reservations
- reserve capacity in a specific AZ for any duration
- you always have access to EC2 capacity when you need it
- no time commitment, no billing discount
- you’re charged at on-demand rate whether you run instance or not
- suitable for short-term, uninterrupted workloads that needs to be in a specific AZ
Summary
a. EC2 Instance: AMI (OS) + Instance Size (CPU+RAM) + Storage + security group + EC2 User Data b. Security Groups: Firewall attached to the EC2 instance c. EC2 User Data: Script launched at the first start of an instance d. SSH: start a terminal into our EC2 instances (port 22) e. EC2 Instance Role: link to IAM roles f. Purchasing Options: on-demand, spot, reserved (standard + convertible), dedicated host, dedicated instance