Prerequisition
We need to have at least k8s locally, aka minikube, installed on our computer. find out the article here
What is POD?
A Pod is the smallest unit in Kubernetes and serves as an abstraction of a container. Each Pod can contain more than one container, but in most cases, a Pod consists of a single container.
🚴 PRACTICE | Run your first pod!
Run this command
k run my-nginx --image=nginx:alpine
The command create new pod called “my-nginx” using image “nginx:alpine”. Then ensuring the installed pod and service using k get pods and k get services.
Then, forward IP to the nginx pod using this command
k port-forward my-nginx 9000:80
Open the browser and access “http://localhost:9000/”, and congratulation now we have our first pod sail!
To delete the pod run k delete pod my-nginx, then we can practice it again and again until we get familiar with it.
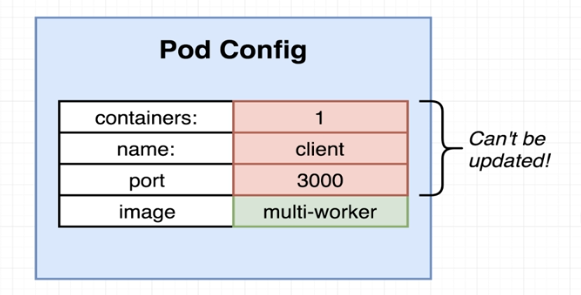
Pod Config
Not all parameters of the pod can be updated. The number of container, name and port cannot be updated.
What is Service?
Kubernetes Services enable communication between various components within and outside of the application. Kubernetes Services helps us connect applications together with other applications or users. For example, our application has groups of Pods running various sections, such as a group for serving frontend loads to users, and other group for running backend processes, and a third group connecting to an external data source. It is Services that enable connectivity between these groups of Pods.
Services enable the frontend application to be made available to end users. It helps communication between backend and frontend Pods, and helps in establishing connectivity to an external data source.
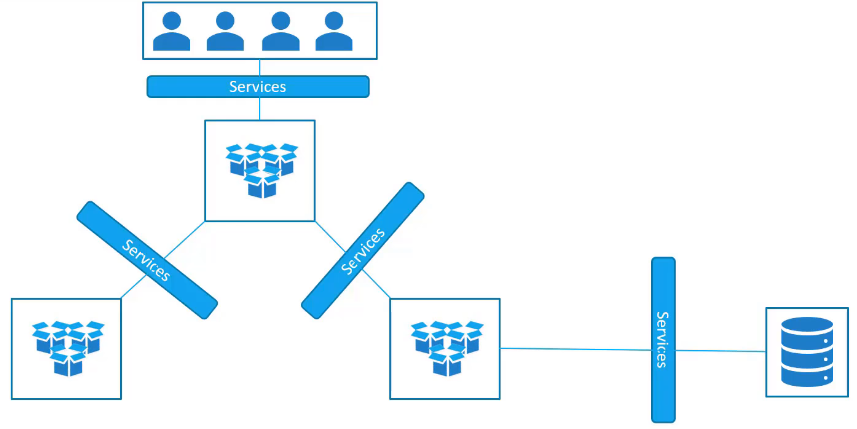 services provide loose connection between application in microservices
Thus Services enable loose coupling between microservices in our application. Let’s take a look at one use case of Services. So far we talked about how Pods communicate with each other through internal networking.
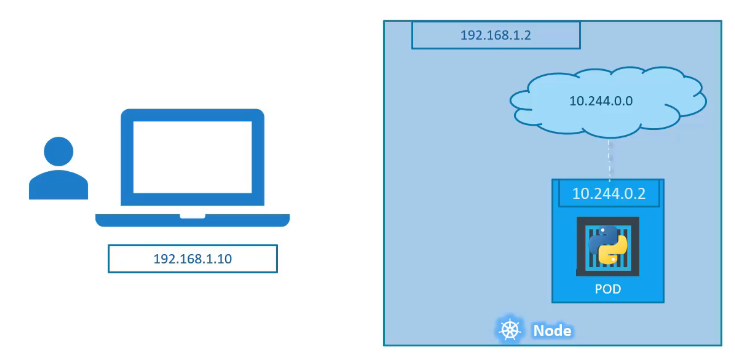
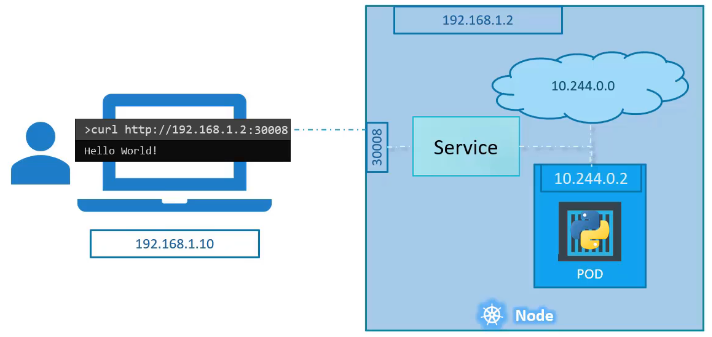
Let’s look at some other aspects of networking in this lecture. Let’s start with external communication. So we deployed our Pod having a web application running on it How do we, as an external user, access the webpage? First of all, let’s look at the existing setup. The Kubernetes node has an IP address and that is one 192.168.1.2.
My laptop is on the same network as well, so it has an IP address, 192.168.1.10. The internal Pod network is in the range 10.244.0.0. And the Pod has an IP 10.244.0.2. Clearly I cannot ping or access the Pod at address 10.244.0.2 as it’s in a separate network. So what are the options to see the webpage?
First, if we were to SSH into the Kubernetes node at 192.168.1.2 from the node, we would be able to access the Pod’s webpage by doing a curl. Or if the node has a GUI we would fire up a browser and see the webpage in a browser following the address http://10.244.0.2.
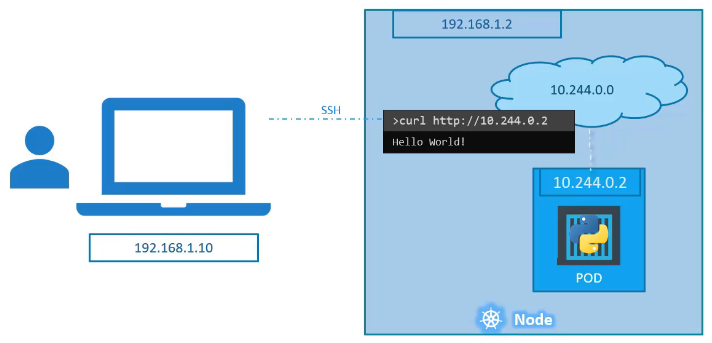
But this is from inside the Kubernetes node and that’s not what I really want. I want to be able to access the web server from my own laptop without having to SSH into the node and simply by accessing the IP of the Kubernetes node. So we need something in the middle to help us map requests to the node from our laptop, through the node, to the Pod running the web container.
This is where the Kubernetes Service comes into play. The Kubernetes Service is an object, just like Pods, ReplicaSet, or Deployments that we worked with before. One of its use case is to listen to a port on the node and forward request on that port to a port on the Pod running the web application. This type of service is known as a NodePort service because the service listens to a port on the node and forward request to the Pods.
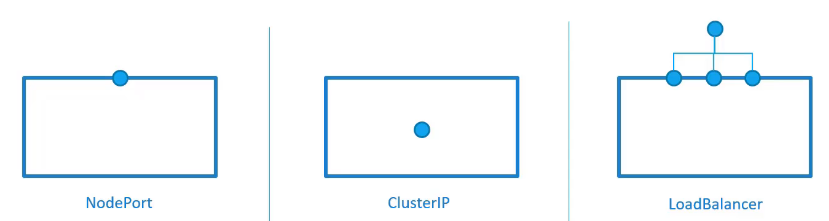
There are other kinds of services available, which we will now discuss. The first one is what we discussed already, NodePort where the service makes an internal port accessible on a port on the node. The second is CluserIP, and in this case, the service creates a virtual IP inside the luster to enable communication between different services, such as a set of frontend servers to a set of backend servers. The third type is a LoadBalancer, where it provisions a load balancer for our application in supported cloud providers. A good example of that would be to distribute load across the different web servers in your frontend tier.
NodePort Service
Let’s discuss about the NodePort Kubernetes service. Getting back to NodePort, few slides back, we discussed about external access to the application. We said that a service can help us by mapping a port on the node to a port on the Pod. Let’s take a closer look at the service. If you look at it, there are three ports involved. The port on the Pod where the actual web server is running is 80, and it is referred to as the target port because that is where the service forwards their request to.
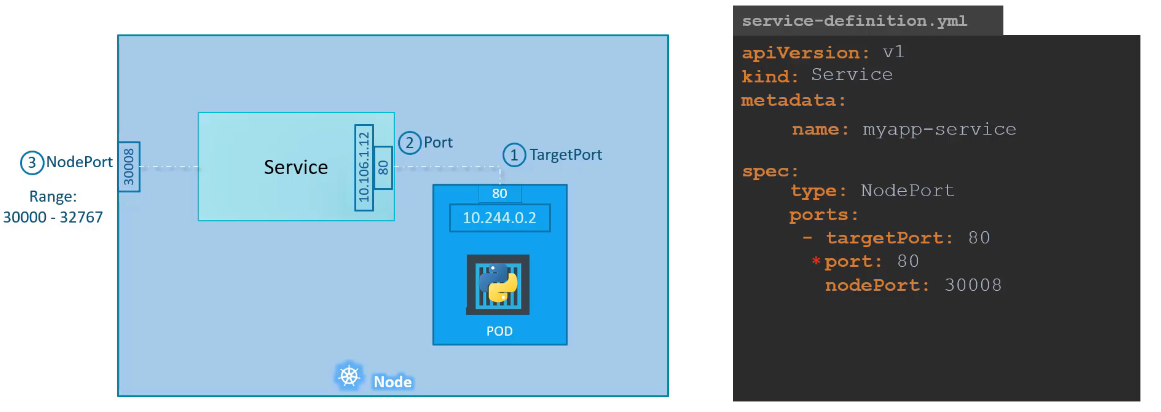
The second port is the port on the service itself. It is simply referred to as the port. Remember, these terms are from the viewpoint of the service. The service is, in fact, like a virtual server inside the node. Inside the cluster it has its own IP address, and that IP address is called the ClusterIP of the service.
And finally, we have the port on the node itself which we use to access the web server externally, and that is as the node port. As you can see, it is set to 30,008. That is because node ports can only be in a valid range which by default is from 30,000 to 32,767.
Let’s now look at how to create the service. Just like how we created a deployment ReplicaSet or Pod in the past, we will use a definition file to create a service. The high-level structure of the file remains the same. As before, we have the API version, kind, metadata, and spec sections. The API version is going to be v1. The kind is of course service. The metadata will have a name, and that will be the name of the service. It can have labels, but we don’t need that for now.
Next, we have spec, and as always, this is the most crucial part of the file, and this is where we will be defining the actual services, and this is a part of a definition file that differs between different objects. Next, we have spec, and as always, this is the most crucial part of the file, as this is where we will be defining the actual services, and this is the part of a definition file that differs between different objects.
In the spec section of a service, we have type and ports. The type refers to the type of service we are creating. As discussed before, it could be ClusterIP, NodePort, or LoadBalancer. In this case, since we are creating a NodePort we will set it as NodePort.
The next part of a spec is ports. This is where we input information regarding what we discussed on the left side of the screen. The first type of port is the targetPort, which we will set to 80. The next one is simply port, which is a port on the service object, and we will set that to 80 as well.
The third is nodePort, which we will set to 30,008 or any number in the valid range. Remember, that out of these, the only mandatory field is port. If you don’t provide a targetPort, it is assumed to be the same as port. And if you don’t provide a nodePort, a free port in the valid range between 30,000 and 32,767 is automatically allocated.
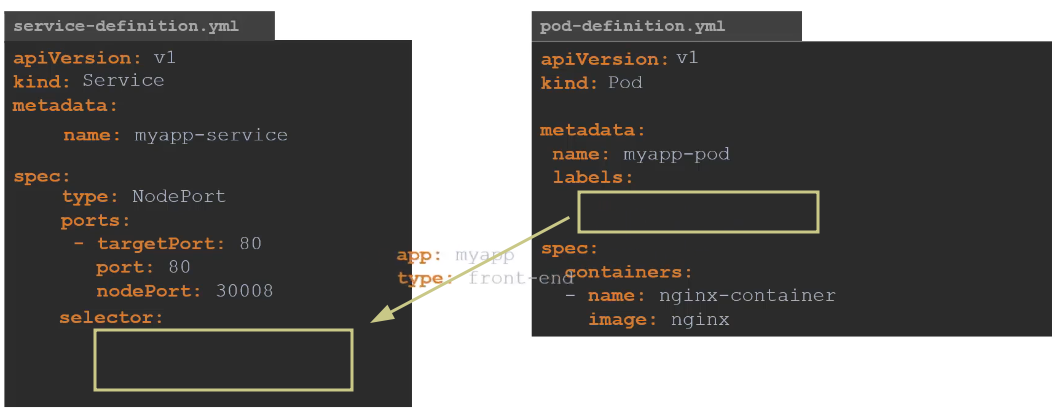
Also, note that ports is an array, so note the dash under the port section that indicate the first element in the array. You can have multiple such port mappings within a single service. So, we have all the information in, but something is really missing. There is nothing here in the definition file that connects the service to the Pod. We have simply specified the target port but we didn’t mention the target port on which Pod. There could be hundreds of other Pods with web services running on port 80.
So how do we do that? As we did with the ReplicaSets previously, and a technique that you will see very often in Kubernetes, we will use labels and selectors to link these together.We know that the Pod was created with a label. We need to bring that label into the service definition file.
So, we have a new property in the specs section and that is called selector, just like in a ReplicaSet and deployment definition files. Under the selector provide a list of labels to identify the Pod. For this, refer to the Pod definition file used to create the Pod.
Pull the labels from the Pod definition file and place it under the selector section. This links the service to the Pod. Once done, create the service using the kubectl create command, and input the service definition file.
And there you have the service created. To see the created service run the kubectl get services command that lists the service, the ClusterIP, and the map ports. The type is nodePort as we created and the port on the node is set to 30,008, because that’s the port that we specified in the definition file.
🚴 PRACTICE | connecting simple pod & service
- download these files:
- or copy-paste this
client-pod.yamlapiVersion: v1 kind: Pod metadata: name: client-pod labels: component: web spec: containers: - name: client image: stephengrider/multi-client ports: - containerPort: 3000client-node-port.yamlapiVersion: v1 kind: Service metadata: name: client-node-port spec: type: NodePort selector: component: web ports: - port: 3050 targetPort: 3000 nodePort: 31515
- apply pod with the file
k apply -f client-pod.yaml
k apply -f client-node-port.yaml